Why Weight Distribution Matters for Daily Carrying
How you pack a bag shapes how it feels on your shoulder, often more than how much is inside it.
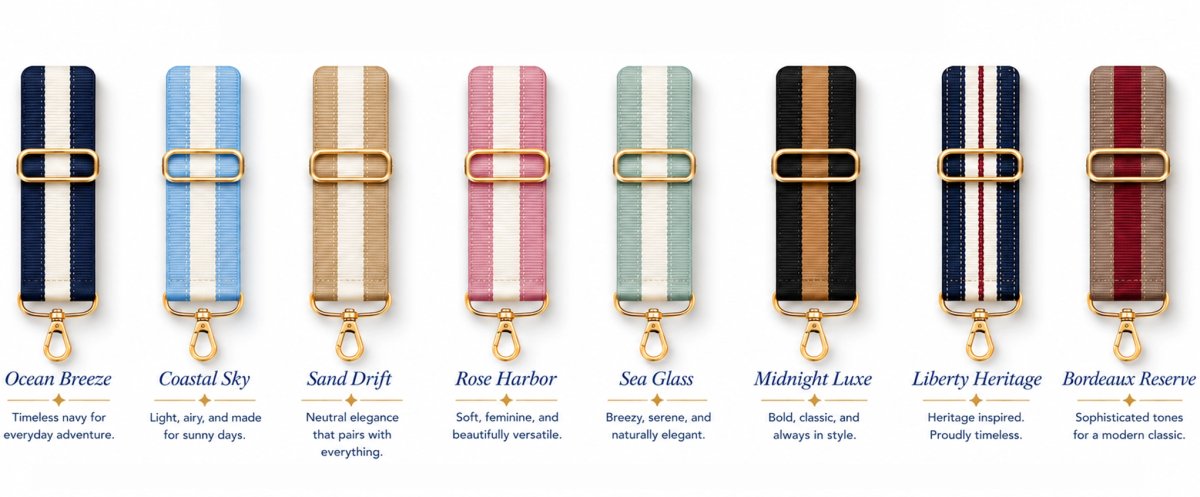
Eight Strapistry™ interchangeable straps in coastal colorways.
Weight distribution is the practice of arranging items inside a bag so the load sits close to your spine and stays balanced left to right.
At Strapistry, we spend a lot of time thinking about how people carry things.
So here's the thing most guides skip: where you place weight matters more than how much you carry.
Key TakeawayThe heaviest items belong close to your spine and centered between your shoulder blades. Everything else fills in around them.
Sorting Your Gear: Identifying Heavy and Light Items
Start by emptying your bag onto a flat surface. Then split everything into three piles: heavy, medium, and light.
Heavy items: laptop, water bottle, books, camera, tools
Medium items: charger, snacks, notebook, small toiletry bag
Light items: keys, wallet, sunglasses, a light jacket
Dense gear is not always the biggest item. A full water bottle weighs more than a folded sweater. Judge by weight, not size.
A common mistake is guessing. Pick each item up. Compare it against your hand.
Once sorted, you have a clear picture of what needs to go where. This takes two minutes and saves your shoulders hours of strain.
Where to Put Heavy Items in a Backpack
Place heavy items in the middle of the back panel, closest to your spine. This is the single most important rule for backpack comfort.
Think of your backpack in three zones:
Top zone: light items you need often
Middle zone: heavy, dense gear
Bottom zone: medium-weight items
Heavy items sit high and close in the middle zone. Not at the very bottom, where they drag on your hips. Not at the top, where they pull you backward.
Keeping the load close to your back reduces the use it has on your shoulders. The closer the weight, the less effort your muscles need to stay upright.
Pro TipTest your packing by leaning forward slightly. If the bag pulls you back, your heavy items sit too high or too far from your spine. Shift them down and inward.
How to Distribute Weight Evenly Across Left and Right
Balance the load side to side, or your body will compensate with every step.
Here is a quick check:
Weigh each side by feel with both hands
Move items until the bag hangs level when you lift it by the top handle
Keep heavy items centered, not pushed to one side
For backpacks, this matters most. A lopsided pack shifts with each stride, and your hips start working overtime.
For shoulder bags, the same idea applies. Split dense gear between compartments instead of letting it all sit on one end.
Left-right balance is easy to overlook. It is also one of the fastest fixes for nagging shoulder and neck tension.
How to Adjust Backpack Straps for Better Balance
Adjust your straps so the bag sits high and close, with most of the weight on your hips. Most people wear backpacks too low and too loose.
Follow these steps:
Loosen all straps before you put the bag on
Tighten the hip belt first so it rests on your hip bones
Pull the shoulder straps snug, but not tight
Adjust the load-lifter straps on top to pull the bag toward your back
Tighten the sternum strap across your chest for stability
Tighten evenly on both sides. A strap that is tighter on one side twists the whole bag.
Check the fit every time you add or remove weight. A bag packed for a full day needs different adjustment than one carrying a laptop and lunch.
Watch OutWearing the hip belt loose puts all the weight on your shoulders. Over a long walk, that leads to aching traps and numb arms. The hip belt is not decoration, it carries the load.
How to Make a Backpack More Comfortable on Long Walks
Comfort on long walks comes from three things: a snug fit, a balanced load, and a bag that moves with you, not against you. But without measurable targets, "snug" and "balanced" are just words. Here's how to turn them into numbers you can check.
Know Your Load Limits
A common backpacking rule of thumb is to keep your pack under about 20% of your body weight for comfortable all-day carrying. For a 70 kg (154 lb) adult, that's about 14 kg (31 lb).
For daily commutes or school, a common pattern is to keep the bag under 10% of your body weight.
These are guidelines, not rules. Your fitness, terrain, and bag design matter. But if you're consistently above these ranges, you're likely fighting physics.
Step-by-Step Fit Check
A proper fit takes two minutes and prevents hours of pain. Follow this sequence every time you load your pack:
Loosen all straps before putting the bag on.
Place the bag on your back and tighten the hip belt first. It should rest on your hip bones (iliac crest), not your waist. You should feel the weight transfer to your hips.
Tighten shoulder straps until they're snug but not tight. You should be able to slide a finger under them.
Adjust load-lifter straps (the ones on top of your shoulders) to pull the bag toward your back. They should angle about 45 degrees.
Fasten the sternum strap across your chest at collarbone level. It should be loose enough to breathe deeply.
Walk around and check: the bag should not sway side to side, and the weight should feel centered on your hips.
If the bag pulls backward, your load is too high or too far from your spine. If it digs into your shoulders, your hip belt is too loose.
Troubleshooting Common Discomforts
Even a well-packed bag can cause issues. Here's how to diagnose and fix them:
Shoulder pain: Hip belt too loose or load too high. Tighten hip belt and move heavy items down and closer to your spine.
Hip pressure: Hip belt too tight or positioned too high. Loosen slightly and ensure it sits on your hip bones, not your waist.
Backward pull: Heavy items placed too high or too far from your back. Shift them to the middle zone, close to your spine.
Swaying: Load is unbalanced left to right, or straps are uneven. Rebalance and tighten straps evenly.
Numb arms: Shoulder straps too tight or sternum strap too high. Loosen shoulder straps and lower sternum strap.
Adjust for Activity
Different activities demand different adjustments. For hiking, keep the load high and close for stability on uneven terrain. For cycling, a lower center of gravity improves balance on the bike. For daily commuting, prioritize quick access and comfort over maximum efficiency.
Keep It Fresh
Even a perfectly packed bag settles as you walk. Re-check the fit after the first 10 minutes, then about once an hour: tighten your straps and reseat the load. This takes 30 seconds and prevents hotspots.
Pro TipWeigh your packed bag before you leave. A simple luggage scale costs little and gives you a baseline. If it's over your target, remove items before you develop bad habits.
If you carry the same bag daily, small upgrades pay off. Strapistry's interchangeable straps and connectors let you change how you carry without buying a new bag. You can switch from shoulder to crossbody to backpack as your day changes.
How to Balance a Shoulder Bag and Tote
A shoulder bag or tote carries weight on one side, which means your body must constantly compensate. Unlike a backpack, where the load is centered, a one-sided bag creates asymmetric strain on your spine, shoulders, and hips. The fix isn't just packing lighter, it's understanding the mechanics and making smart adjustments.
Why One-Sided Carry Is Different
When you carry a bag on one shoulder, your body leans away from the weight to counterbalance it. This curves your spine and tightens the muscles on one side. Over time, this may contribute to neck and shoulder tension.
Keep one-sided bags as light as practical. If your shoulder bag regularly feels heavy, switch to a crossbody or backpack carry.
Packing for One-Sided Carry
Place the heaviest items in the compartment closest to your torso. This shortens the lever arm, the distance between the weight and your spine, reducing the strain on your shoulder.
Avoid packing items that can shift. A loose water bottle or book that slides around will constantly change the bag's center of gravity, forcing your muscles to adjust. Use dividers or small pouches to keep everything in place.
Adjusting the Strap
For shoulder bags, adjust the strap so the bag sits at your natural waist, not below your hip. A longer strap lets the bag swing, which increases strain. Shorten it so the bag rests against your side, close to your body.
For crossbody bags, the strap should cross from one shoulder to the opposite hip. This spreads the weight across your torso, reducing pressure on any single point.
Switch Sides Regularly
Even a well-packed bag strains one side if you never swap. Switch shoulders every 20 to 30 minutes, or use a crossbody strap to alternate. If you're walking long distances, consider a backpack or a bag with a waist belt to transfer weight to your hips.
Safety and Accessibility
Keep emergency items, phone, keys, medication, in an easy-to-reach pocket. If you're carrying hazardous items like tools or sharp objects, secure them so they can't shift or poke through the bag. For cycling, a shoulder bag can swing and throw off your balance; use a pannier or backpack instead.
When to Switch to a Backpack
If you regularly carry a heavy load, a shoulder bag or tote is not the right tool. A backpack distributes weight across both shoulders and your hips, reducing strain.
Bag Type
Put Heavy Items
Keep Light Items
Main Goal
Backpack
Middle, close to spine
Top and outer pockets
Load on hips
Shoulder bag
Compartment nearest torso
Front and outer pockets
Stay close to body
Tote
Center of the bag
Edges and handles
Avoid one-sided pull
Crossbody
Against your back or chest
Front pocket
Spread weight across torso
Hands-free options help a lot here. A crossbody strap spreads weight across your torso instead of loading one shoulder.
That is the goal: the same bag, carried better.
Frequently Asked Questions
Where should heavy items go in a backpack?
Place heavy items in the middle of the backpack, close to your back and centered between your shoulder blades. This keeps the weight near your body's center of gravity, reducing strain on your shoulders and lower back. Avoid putting heavy items at the very bottom, which can pull the pack down and cause you to lean forward, or at the top, which can make the bag feel top-heavy and unstable.
How do you adjust backpack straps for better weight distribution?
Start by loosening all straps. Put the backpack on and tighten the hip belt first so it sits on your hip bones. Then tighten the shoulder straps until they feel snug but not tight. Adjust the load-lifter straps on top of your shoulders to pull the pack closer to your back. Finally, tighten the sternum strap across your chest to keep the shoulder straps from sliding outward. Re-check after 10 minutes of walking and adjust as needed.
How can you stop a shoulder bag from pulling to one side?
Switch the bag to the opposite shoulder every 20 to 30 minutes to balance the load. Place heavier items in the center of the bag rather than on one side. If your bag has a crossbody strap, wear it across your body instead of on one shoulder to spread the weight across your torso. Adding a wider, padded strap can also reduce pressure points and keep the bag from digging in.
Is 50/50 weight distribution good in a bag?
Yes, aiming for roughly equal weight on the left and right sides helps prevent muscle strain and keeps the bag from tilting. For backpacks, also aim for the load to sit close to your back and centered vertically. For shoulder bags, alternate sides regularly. Perfect 50/50 isn't always possible, but getting close reduces fatigue and discomfort during long carries.
Carrying heavy gear every day takes a toll, and most bags were never built to help. At Strapistry, we designed a modular carry system that adds comfort and versatility to the bags you already own. Our interchangeable straps and Signature Gold Connectors™ attach through the handles or holes your bag already has, and with the Complete Carry Kit you can move between crossbody, shoulder, and backpack carry in moments. No new bag required. Shop Carry Kits and carry your essentials with ease and elegance.
So easy adding the anchors. Clipped the straps and carry my Bogg bag everywhere I go, I switch from backpack to crossbody most the time. I chose the light blue stripe straps. Love them..